Circle Arc on Circle (Temporary Objects Menu)
|
|
Circle Arc on Circle (Temporary Objects Menu) |
www.CAD6.com |
|
This command is used to create a Temporary Object as a circle arc on top of an existing circle. The arc is determined by identifying a circle and entering the start and end angles.
This command is particularly useful if a circle arc is to be drawn on a Construction Aid element. In this case, the Construction Aid circle must be identified and then the start and end angles are used as intersections within the Construction Aid.
If a circle arc is to be drawn while working in isometric or dimetric view, then the command Ellipse Arc > Vector - Vector must be used, because the result on the page is elliptical not circular.
Any circle which exists independently or as part of another object can be identified as the reference object. This can also be the arc of a circle segment or a circle arc within a surface.
The arc's start angle can be entered by clicking the mouse anywhere in the drawing. The position of this point relative to the center determines the start angle.
The arc's end angle can be entered by clicking the mouse anywhere in the drawing. The position of this point relative to the center determines the end angle.
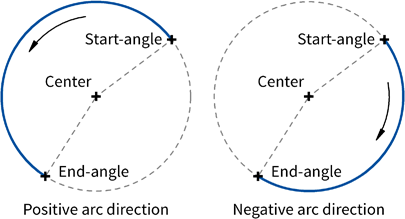
The resulting arc is affected by the current arc direction setting. This is set using the command Toggle Arc Direction (F2), with the F2 key or the button in the panel. If the arc direction is positive, then the arc is drawn in a mathematically positive direction (i.e. counterclockwise) from the start angle to the end angle. If the arc direction is negative, then the arc is drawn in a mathematically negative direction (i.e. clockwise) from the start angle to the end angle (see graphic).
The resulting arc is shown while it is being entered and changes immediately if the current arc direction is changed.
|
CAD6studio Release 2025.0 - Copyright 2025 Malz++Kassner® GmbH